- Introduction
- Requirements
- How contacts are created
- Creating a contact by hand
- The contact page
- Relation stage
- Original source
- Owner and communication team
- Unique keys
- Finding duplicates
- Merging two contacts
- Points to keep in mind
Introduction
A contact is your client's record in Alaaqat. Every WhatsApp, Facebook and Instagram conversation belongs to a contact, so the contact page is where your team sees who the client is, what stage they are at, and everything that was said to them.
That only works while each client has one contact. When the same person exists twice, their history is split between two records: the agent who opens one doesn't see what was promised on the other, and two team members can end up answering the same client.
This document explains how contacts are created, what their stage and source mean, and the three tools that keep your contacts clean: unique keys that stop duplicates from being created, Find duplicates that shows the ones you already have, and merging, which turns two contacts back into one.
Requirements
| Requirement | Detail |
|---|---|
| Object | Contacts must be turned on. See Objects. |
| Permissions | View All Contacts, View Team Contacts or View User's Contacts to see contacts, and View Contact Details to open any contact. Create New Contact to add one, Edit Contact to change one or to merge two, and Delete Contact to delete one. Turning a unique key on or off needs Edit Custom Field. |
How contacts are created
Most contacts are created by Alaaqat itself. The way a contact was created decides its first stage and its source:
| How the contact was created | Relation Stage | Original Source | Original Source Drill-Down 1 |
|---|---|---|---|
| A client writes to you for the first time on WhatsApp, Facebook or Instagram | Lead | The channel: whatsapp, facebook or instagram |
conversations |
| The contacts of your WhatsApp Business app are synced (see Business App) | Lead | whatsapp |
sync |
| A WhatsApp verification code is sent through the API to a number that has no contact yet | Lead | whatsapp |
api |
| A file is imported | As in the file | import |
Empty |
| A team member creates it by hand | As chosen in the form | Empty | Empty |
Creating a contact by hand
- Go to Objects > Contacts and click New Contact.
- Fill in First Name, the only required field.
- Fill in any of the other fields the form shows, such as Last Name, Email, Phone, WhatsApp Number and Relation Stage. For a phone number, pick the country from the flag, then type the rest of the number.
- To fill in another property, choose it under Add Property. To remove a field you don't need, click its bin icon. The form remembers the fields you add and remove, in this browser.
- Click Submit.
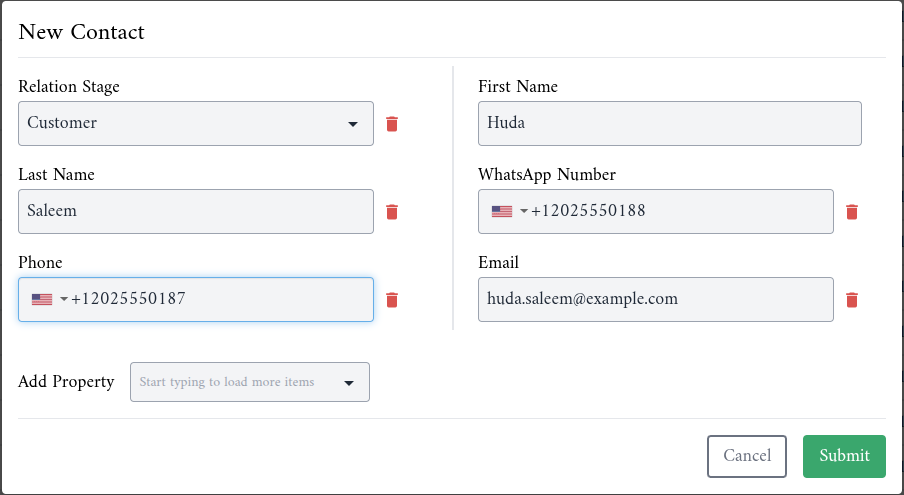
Fill in the WhatsApp Number whenever the client uses WhatsApp. It is the number broadcasts and templates are sent to, and the WhatsApp icon on the contact page only appears when it is set.
The contact page
A contact's page is laid out like every record page (see Lists and record pages), with a few additions on the Details card:
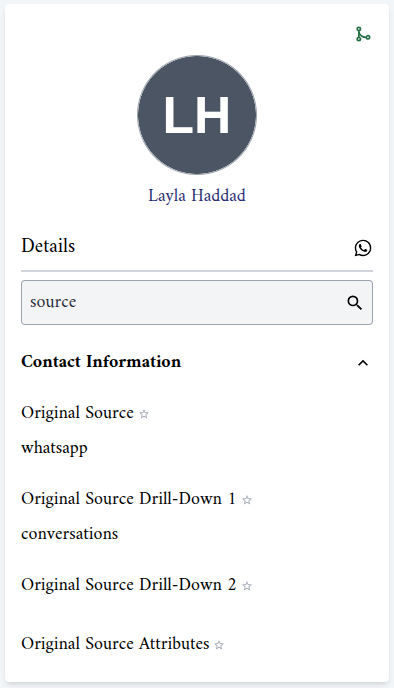
- The merge icon, in the top corner of the card, merges this contact into another one. See Merging two contacts.
- The WhatsApp icon, next to Details, sends the contact a WhatsApp template. See the Templates document.
- The search box finds a property by name. In the example above, searching for "source" shows the four source properties.
In the Associations tab, each conversation the contact has with your channels gets its own card, with the chat inside it, next to the contact's notes, activities, deals and tickets.
Relation stage
Relation Stage tells your team where the client is in your sales process. A new account offers these stages:
| Stage | Typical use |
|---|---|
| Lead | Someone who got in touch but hasn't been qualified yet. Contacts created from conversations start here. |
| Closed-Lost | A client who decided not to buy. |
| Prospect | A lead you are actively working with. |
| Qualified | A prospect who has the need and the budget. |
| Opportunity | A qualified client with a concrete offer on the table. |
| Customer | A client who has bought. |
| Recurring | A customer who buys again regularly. |
| Inactive | A former client who no longer buys. |
The stage doesn't move by itself. A team member changes it on the contact page, or a workflow changes it with the Update Contact action (see the Workflow introduction).
To see the contacts at one stage, pick it in the All Stages list above the contacts table.
The stages are the options of the Relation Stage property, so you can rename them, add your own and remove the ones you don't use, in Settings > Properties > Contacts. The steps are the same as for customising deal stages.
Original source
Original Source records where a contact came from, using the values in the table under How contacts are created. Original Source Drill-Down 1 adds the detail of how, for example conversations or sync.
When a client's first message comes from an ad or a link that carries a reference, Original Source Drill-Down 2 and Original Source Attributes keep the details that Meta passes on with it.
Alaaqat fills these four properties in when it creates the contact, and they can't be edited. You can still add them as columns to the contacts list, or filter the list on them to see, for example, every contact that came from Instagram.
Owner and communication team
Two properties in the Contact Users group say who follows up with the contact:
- Owner: the team member responsible for the client.
- Communication Team: the team that follows up with the client.
Set them by hand on the contact page, or let a workflow do it as new clients write in; see the Auto Assignment document.
They also decide who can see the contact. A team member with View All Contacts sees every contact. Without it, View Team Contacts gives access to the contacts whose Communication Team is one of their teams, and View User's Contacts to the contacts they own.
Unique keys
A unique key is a property whose value can belong to one contact only. In a new account, Phone, Email and WhatsApp Number are unique keys, and they carry a Unique key label in Settings > Properties > Contacts.
Alaaqat refuses a value that another contact already holds in a unique key:
- When you create a contact, the form warns you as soon as you type the value, links to the contact that already has it, and names the properties that match. Submit stays disabled until you change the value.
- When you edit a contact, saving the duplicate value fails.
- When you update several contacts at once, a unique key can't be given the same value on all of them.
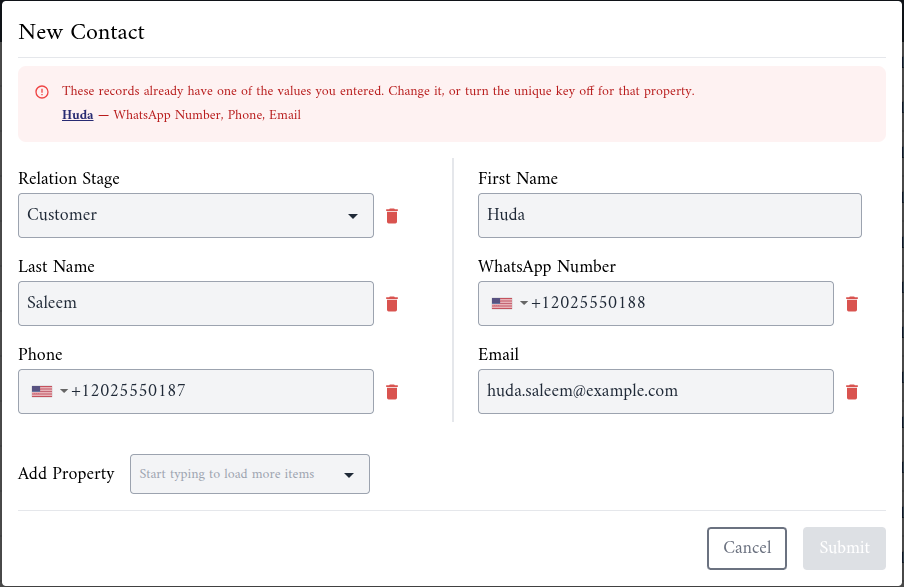
When the form warns you, the client usually already has a contact. Open it from the link and update it, instead of creating a second one.
Imports use unique keys too: a row whose unique key matches an existing contact updates that contact or is skipped, instead of creating a duplicate. See How rows are matched.
Turning a unique key on or off
- Go to Settings > Properties > Contacts.
- Click the pencil next to the property, then click Next.
- Tick or untick Unique key.
- Click Save.

A property can only become a unique key while no two contacts share a value in it. If some do, Alaaqat refuses the change and names the value and how many contacts hold it. Find those contacts with Find duplicates, merge them, then turn the key on.
The other objects have unique keys too, and they work the same way.
Finding duplicates
Find duplicates shows the records that share a value with at least one other record. It is available on the list of every object.
- In the toolbar above the list, click the duplicates icon (its tooltip reads Find duplicates).
- Under Find duplicates by, choose the property to compare, for example First Name or Phone.
- Click Apply.
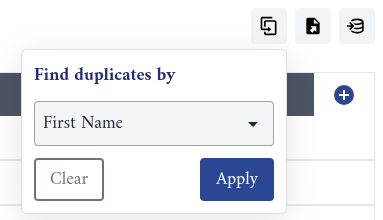
The list now shows only the contacts whose value in that property is shared, sorted by that value so that the duplicates sit next to each other. The icon shows the property's name while the search is on.
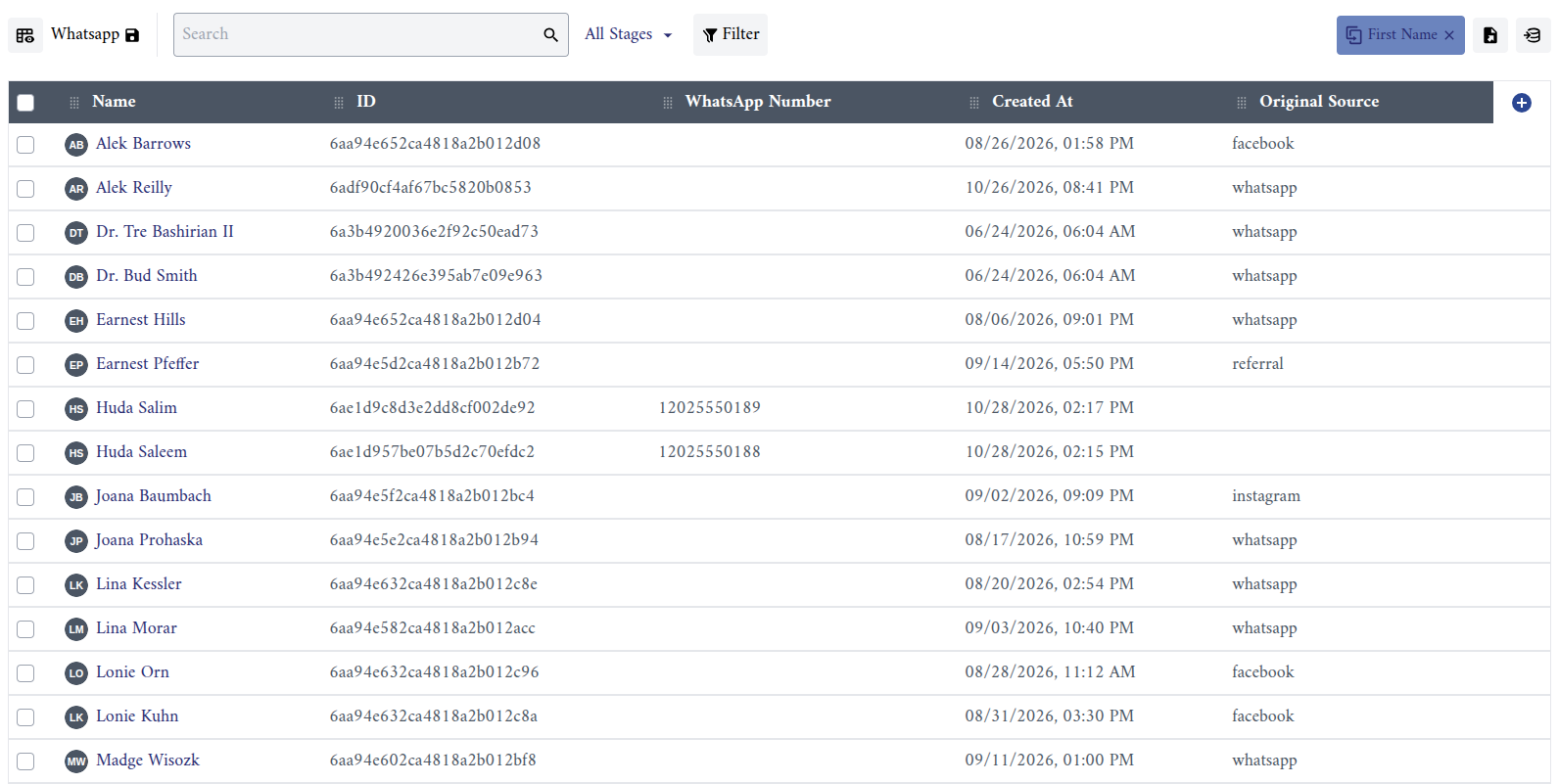
- Contacts with an empty value are left out.
- Values must be exactly the same to count: "Huda" and "huda" are different values.
- The search works inside the list you are looking at, so a search term, a stage or a filter narrows it further.
To go back to the full list, click the × on the icon, or open the icon and click Clear.
A shared first name is a hint, not a proof: two different clients can be called Huda. Compare the phone numbers and the conversations before you merge.
Merging two contacts
Merging moves everything from one contact into another, then deletes the first one.
{warning} A merge can't be undone. The contact whose page you open is the one that is deleted. Open the duplicate, not the contact you want to keep.
Step 1: Open the contact to remove. Open the duplicate's page.
Step 2: Click the merge icon in the top corner of the Details card. Its tooltip reads Merge current contacts into another contact.
Step 3: Choose the contact to keep. In Contact, type at least two characters of its name and select it.
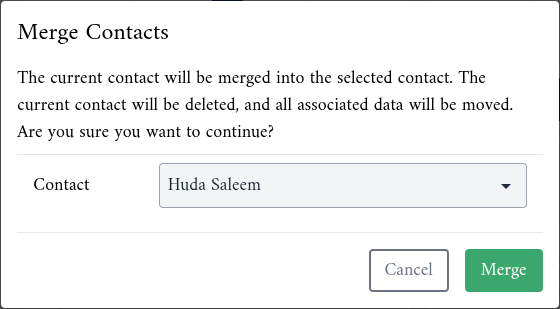
Step 4: Click Merge.
- If the two contacts never hold different values in the same property, the merge happens straight away. Alaaqat shows Contacts merged successfully and takes you back to the contacts list.
- If some properties hold a different value on each contact, a second Merge Contacts window lists them. For each property, choose the value to keep. The value of the contact you are keeping is selected to start with. Then click Merge.
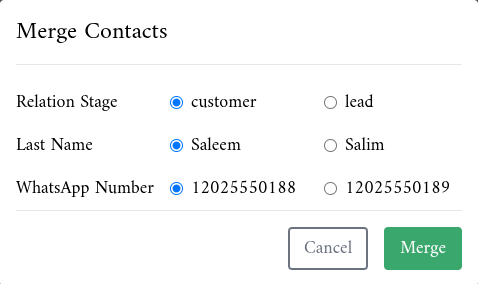
What the kept contact receives:
- The removed contact's conversations, on every channel. Both contacts' chats stay on the kept contact, even when it keeps only one of their WhatsApp numbers.
- Its notes, and its links to deals, tickets and companies.
- Every property that was empty on the kept contact and filled in on the removed one.
What is not moved:
- The files and folders in the removed contact's Attachments tab.
- Its links to products and invoices.
- Its Activities history.
Download the files you need, and link the products and invoices to the kept contact, before you merge.
Points to keep in mind
- Merge before you turn a unique key on: the key can't be turned on while two contacts share a value.
- Merging works on two contacts at a time. For three copies of the same client, merge twice.
- Merging needs the Edit Contact permission.
- Nothing moves a contact's stage for you. Agree with your team on when each stage is set, or set it from a workflow.