- Introduction
- Requirements
- The list toolbar
- Searching a list
- Filtering a list
- Filter operations
- Columns, sorting and page size
- Step 1: Set up the list
- Step 2: Save it as a view
- Step 3: Open a view
- Changing or deleting a view
- Your default view
- Points to keep in mind
Introduction
A list of a few thousand contacts is only useful when each team member can find the part of it they work on: the new leads from Instagram, the tickets still open, the deals about to close. Building that list again every morning, filter by filter, wastes time, and two agents who build it slightly differently end up working from different lists.
Filters narrow a list down to the records that match your conditions. A saved view keeps those filters, together with the search, the sort order and the columns you chose, under a name. You open the view and the list is ready, and when you share a view with the whole team, everyone works from the same list.
This document explains how to search and filter any list in Alaaqat, how to save what you set up as a view, and how to make a view the one that opens by default. It works the same way on every object: contacts, companies, tickets, deals, products and invoices.
Requirements
| Requirement | Detail |
|---|---|
| Object | The object must be turned on. See Objects. |
| Permissions | A permission that lets you see the list, for example View All Contacts, View Team Contacts or View User's Contacts for the contacts list. You need nothing more to search, filter or save views. |
| Plan | The number of views an account can save for each list depends on the plan. See the plans on the pricing page. |
The list toolbar
Open any list from the menu, for example Objects > Contacts. The toolbar above the table holds everything this document covers.
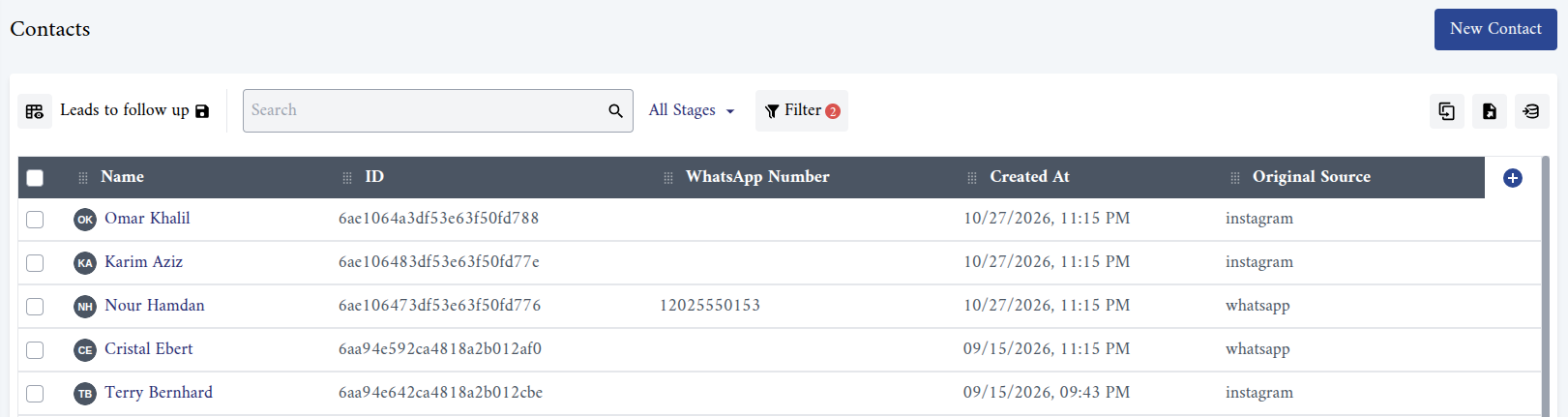
From left to right:
- The views icon opens the list of saved views. Next to it is the name of the view that is open, with a save icon, or Main View when no view is open.
- Search finds records by name.
- On the contacts list, All Stages shows the contacts at one Relation Stage only.
- Filter opens the filter conditions. A number on the button shows that filters are on.
- On the right, the icons find duplicates, export and import. See Finding duplicates and Import and Export.
Searching a list
Type in Search and press Enter. The list shows the records that contain what you typed, anywhere in the searched properties:
| List | Searched properties |
|---|---|
| Contacts | First Name, Last Name, Email, Phone and WhatsApp Number |
| Companies | Name |
| Tickets | Ticket Name |
| Deals | Deal Name |
| Products | Name and SKU |
| Invoices | Invoice Number and Title |
To find records by any other property, use a filter.
Filtering a list
A filter is a set of conditions. Each condition compares one property with a value, for example Relation Stage equals Lead.
- Click Filter.
- In Property, choose the property to check. Type part of its name to find it quickly.
- In Operation, choose how to compare it. The operations depend on the property's type; see Filter operations.
- In Value, enter or choose the value to compare with. Exists and Doesn't Exist need no value.
- To add a condition that must also be true, click + And. To add another group of conditions, click + Or.
- Click Apply.
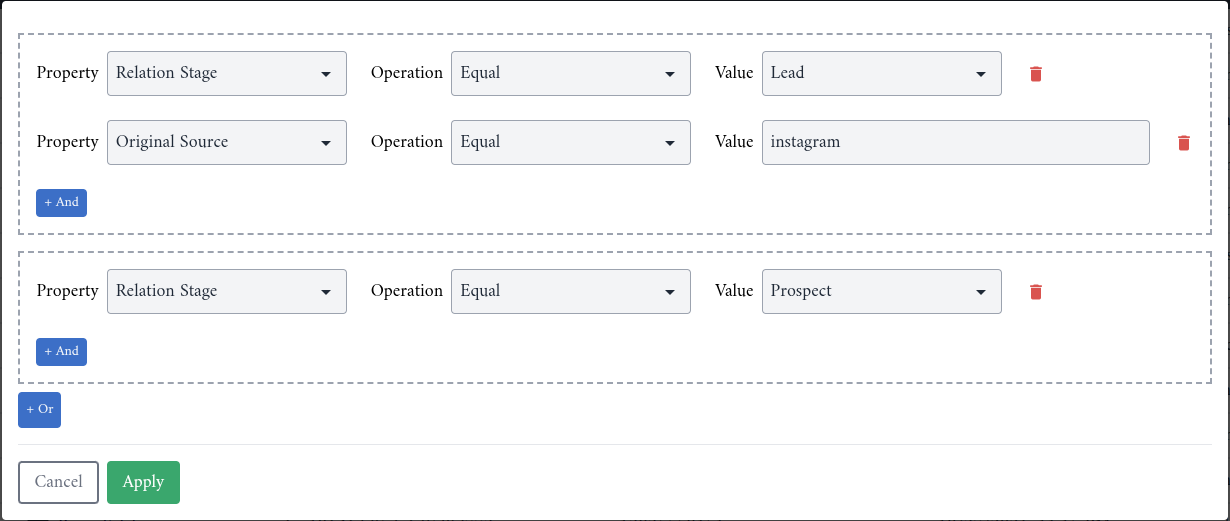
Each dashed box is a group. A record matches a group when it meets every condition in it, and it appears in the list when it matches at least one group. The filter in the example above shows the leads who came from Instagram, and every prospect, wherever they came from.
To remove a condition, click its bin icon. To turn filtering off, remove every condition and click Apply.
Filters work inside the list you are looking at, so they add to the search and, on contacts, to the stage you picked in All Stages.
Filter operations
| Property type | Operations |
|---|---|
| Text, single select, phone number, yes/no, user and team | Exists, Doesn't Exist, Equal, Not Equal |
| Number, currency, date, date and time, and time | Exists, Doesn't Exist, Equal, Not Equal, Greater Than, Greater Than or Equal To, Less Than, Less Than or Equal To |
| Image | Can't be filtered |
- Exists finds the records where the property has a value, and Doesn't Exist the records where it is empty.
- Equal on a text property matches the whole value, exactly as it is written, including upper and lower case. "Riyadh" doesn't match "riyadh" or "Riyadh office".
- For a date, Greater Than means after the date you choose, and Less Than means before it.
- For a single-select property, such as Relation Stage, choose the value from the list rather than typing it.
Columns, sorting and page size
- Add or remove columns: click the + at the end of the table header, choose the properties to show, then click Save. The Selected Columns list shows what the table will display.
- Reorder columns: drag a column by the handle next to its title.
- Sort: click a column's title to sort the list by it. Click it again to reverse the order.
- Page size: choose how many records a page shows under the table, next to Per Page.
The columns you choose are also the columns an export writes to the file.
Step 1: Set up the list
Search, filter, sort and choose the columns until the list shows exactly what the view should show. A view saves:
- the search,
- the filters, and on contacts the stage chosen in All Stages,
- the sort order and the page size,
- the columns, in their order.
Step 2: Save it as a view
- Click the views icon at the start of the toolbar.
- Click New View.
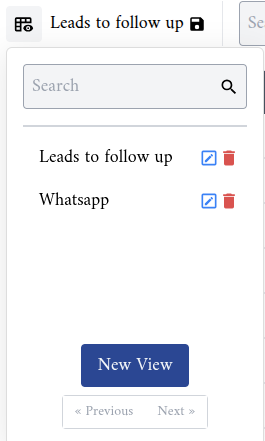
- In Name, enter a name your team will recognise, for example "Leads to follow up".
- In Who can see this view?, choose Only Me to keep the view to yourself, or All Users to share it with everyone in the account.
- Tick Set as my default view if this list should open on this view. See Your default view.
- Click Save.
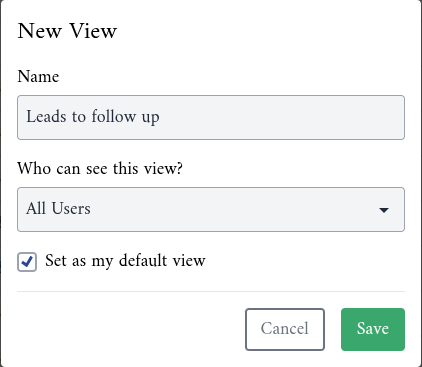
The view opens straight away, and its name appears next to the views icon.
Step 3: Open a view
Click the views icon and click the view's name. The list takes the view's search, filters, sort order and columns. To find a view in a long list of views, type part of its name in the search box at the top of the views list.
The views list shows your own views and the views other team members shared with All Users.
Changing or deleting a view
Saving changes into a view. Changing the filters or columns while a view is open changes only what you see; the view itself stays as it was. To keep the changes, click the save icon next to the view's name and confirm. The view is replaced by what the list shows now.
Renaming or sharing a view. In the views list, click the pencil next to the view. You can change its Name, Who can see this view? and Set as my default view, then click Save.
Deleting a view. Click the bin next to the view and confirm. Deleting a view deletes no records.
Only the team member who created a view can change or delete it, even when it is shared with All Users.
Your default view
When you open a list from the menu, Alaaqat opens your default view of that list, with its filters and columns. Without a default view, the list opens on Main View: every record you are allowed to see.
To choose your default view, tick Set as my default view when you create the view, or open the pencil next to one of your views and tick it there. Each team member has their own default view for each list, so your choice changes nothing for the rest of the team.
Only a view you created can be your default. To start every day on a view a teammate shared, open it, then save it as a new view of your own with Set as my default view ticked.
Points to keep in mind
- A view is a saved list, not a copy of the records. Records that start matching the filters later appear in it, and records that stop matching leave it.
- Sharing a view with All Users shares its filters, not access to records. Each team member still sees only the records their permissions allow, so the same view can show a different number of records to different people.
- Every view saved on a list counts towards your plan's limit for that list, including the views other team members keep to themselves. When the limit is reached, Alaaqat offers to upgrade the plan instead of saving the view.
- Views belong to one list: a view saved on contacts isn't offered on deals.