- Introduction
- Requirements
- Selecting records
- Editing records in bulk
- Deleting records
- Points to keep in mind
Introduction
After an exhibition you come back with 120 new leads who all belong to the sales team. Opening each contact to set its Communication Team takes an afternoon, and the contacts you miss stay with nobody. The same happens when a product line is discontinued, or when a batch of test records has to go.
From any list in Alaaqat, you can select records and change their properties in one go, or delete them. Deleting from the list is also how you delete a single record.
This document explains how to select records, how to edit them in bulk, and how to delete them. It works the same way on every object: contacts, companies, tickets, deals, products and invoices.
Requirements
| Requirement | Detail |
|---|---|
| Seeing the list | A permission that lets you see the list, for example View All Contacts, View Team Contacts or View User's Contacts. |
| Bulk edit | The object's edit permission, for example Edit Contact or Edit Deal. |
| Delete | The object's delete permission, for example Delete Contact or Delete Deal. |
Delete and Update appear for every team member who selects records. Without the permission, Alaaqat refuses the change.
Selecting records
Every row of a list starts with a checkbox. Tick the records you want, and the line above the table shows how many are selected, followed by Delete and Update.
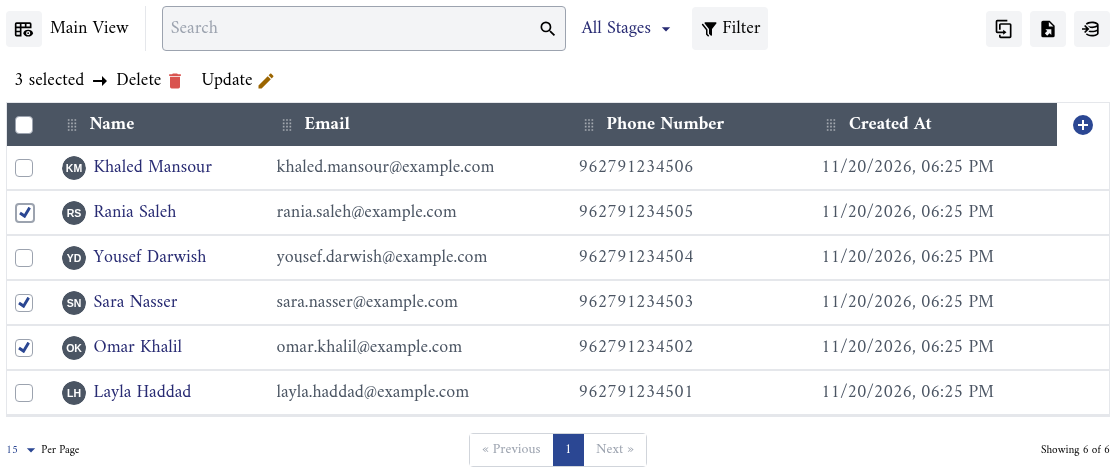
- The checkbox in the header selects every record on the page you are looking at, and clicking it again clears the selection. On a small screen, use Select All.
- A selection covers one page only. To act on more records at once, show more of them per page first: Per Page, under the table, goes up to 250.
- Narrow the list first. Search or filter the list down to the records you mean, then select all of them. See Views and Filters.
Editing records in bulk
A bulk edit gives the same value to one or more properties on every selected record, for example Relation Stage set to Customer on the contacts who just paid.
Step 1: Select the records
Open the list, narrow it down, and tick the records to change, as explained in Selecting records.
Step 2: Open the bulk edit
Click Update. The Bulk edit window opens, with the number of records in its title.
Step 3: Add the properties and their values
- In Add Property, choose the property to change. Type part of its name to find it.
- The property appears above Add Property, with a field for its value. Choose or type the value.
- To change another property too, choose it in Add Property again.
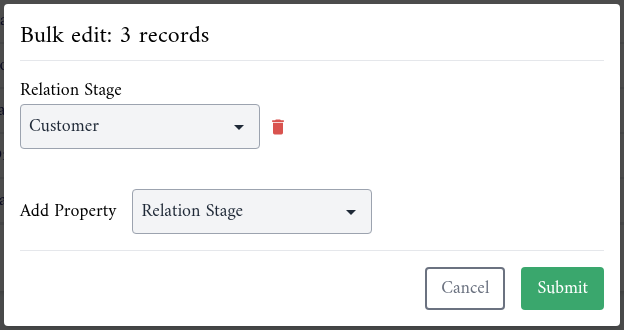
The bin next to a property takes it out of the bulk edit. Properties that Alaaqat fills in itself, such as Contacts Count, are not offered.
{warning} Every property you add is written to every selected record, even when you leave its value empty: an empty value empties that property on all of them. Add only the properties you mean to change.
Step 4: Submit
Click Submit. "Processing in background. Please check back after few minutes." appears, and you can keep working.
When all the records are changed, you receive an Update completed notification. Reload the list to see the new values.
Deleting records
Deleting removes the records from Alaaqat for good. It is the only way to delete a record, even a single one.
Step 1: Select the records
Open the list and tick the records to delete. To delete one record, tick only that one.
Step 2: Delete and confirm
Click Delete, then Confirm in "Are you sure?". "Deleted Successfully" appears and the records leave the list.
What is deleted with each record:
- The record and all its properties.
- Its notes.
- Its links: the record disappears from the cards of the records it was linked to. Those records themselves are not deleted. See Linking Records.
{warning} A deletion can't be undone, and Alaaqat keeps no recycle bin. Before you delete many records, export them as a backup; see Import and Export.
Points to keep in mind
- A bulk edit can't set a unique key. Giving several records the same value in a property that is a unique key would make them duplicates, so Alaaqat refuses the bulk edit. See Unique keys.
- The values are checked as in a single edit. A value that would be refused on the record page is refused here too.
- Each change is recorded on its record. The bulk edit appears in the activity history of every changed record, under your name.
- Integrations hear about every record. A bulk edit sends an update event, and a deletion a delete event, for each record to the webhooks you have set up.
- Bulk editing is not undone by another bulk edit. The records' old values may differ from one another, and a bulk edit can only give them all the same value. Check the selection and the values before you submit.